VLC is a popular media player platform and it provides one of the best video streaming experiences to its users. The videos may attach to various titles and subtitles to stream videos based on it. Check that the VLC player is streaming videos with your existing attached subtitle. If not, it means your subtitle is not according to the VLC to connect and play a particular video for you.
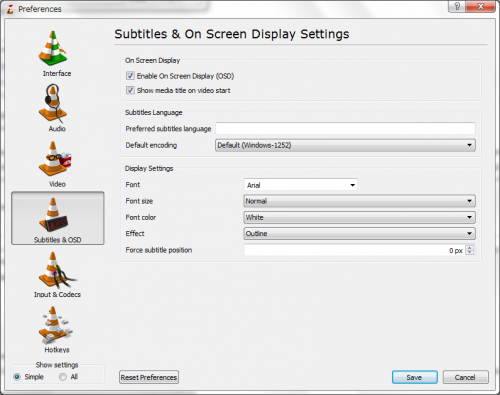
Customizing Subtitles Appearance in VLC
To organize and change your font and orientation related settings of subtitles in VLC, follow these instructions:
- Through the Subtitles or OSD button of VLC Media Player, we can modify the appearance of the subtitles like its font size, color, font style, and we can even add shadow to it.
- We may use these options to modify the font managements and its orientations by changing as per our requirements from the default one.
- You can customize your subtitles according to its, background-size and other various subtitle related settings.
Read More
Here are the methods and their appropriate steps to modify the subtitles settings in chronological sequence:
- First of all, you have to hit the “Tools” tab. It is located inside the VLC player page.
- Now, tap on “Preferences” tab under the Tools.
- Next, you have to hit the “Subtitles/OSD” tab to see the overall preferences available on your device.
- Then, you have to make sure whether the checkbox related to “Enable subtitle” is marked or not.
- In case you wish to apply a specific font style, and then you may organize it from the available pull-down menu.
- Then, you have to choose any of the Font styles as you wish rather than the default one.
- Now, tap the Font size pull drop menu in order to choose your desired font size from the available listing.
- Next, you have to tap on the “Auto” option from the list. It will automatically provide you with the particular font size as required by VLC.
- You should set the font size to default mode in case you use to view the video in full-screen mode.
- In case, the existing subtitle seems not as effortlessly readable content, and then you need to click the Outline thickness pull- drop list to modify it and there hit the default option.
- After that, you have to tap the “Thick” option from the list of pull-down menu in case you want extra convenience in reading.
- For your text and other outline options, you have to hit the particular tab for color. It is readable on almost the subtitles backgrounds. Here, you have to change the color to other various shades besides the default black and white.
- If you are unable to see the subtitle’s color to play the video, then, you have to mark the box which says “Add a background”.
- You can also fix the subtitles in a particular location and prevent them from moving from its place even when the size of VLC media window changes. To do so, you have to hit the option that says “add a number to the Force subtitle position”.
- Now, you have to tap the option “Save” once you finished updating and checking the preferences options.
Alex Smith is a Microsoft Office expert and has been working in the technical industry since 2002. As a technical expert, Alex has written technical blogs, manuals, white papers, and reviews for many websites such as office.com/setup.
Comments
Post a Comment